
A large kitchen sounds like a dream, until you realize how easily all that square footage can feel empty, inefficient, or cluttered. Without deliberate planning, expansive kitchens become collections of dead zones, awkward traffic patterns, and cabinets you forget exist. The challenge isn’t filling the space: it’s organizing it so every inch works harder. Whether you’re renovating an older home with a generous footprint or designing new construction, large kitchens demand zoning strategies, intentional lighting, and storage that scales. Done right, a spacious kitchen becomes the multitasking hub every home needs, not just a room that echoes.
Key Takeaways
- Large kitchen design requires intentional zoning strategies to prevent wasted space and inefficient traffic patterns that defeat the purpose of extra square footage.
- Organize your kitchen into functional zones—prep, cooking, baking, beverage, and serving—with dedicated counter space and nearby storage so each station feels self-contained.
- Keep work triangle legs (connecting sink, stove, and refrigerator) between 4 and 9 feet; in spacious layouts, create multiple triangles for simultaneous cooking without crossing paths.
- Island placement demands at least 42 inches clearance from perimeter cabinets for single-cook kitchens and 48 inches for multiple cooks; islands over 10 feet can feel like a separate room.
- Layered lighting—ambient recessed LEDs, task lighting under cabinets, and accent strips—is essential in large kitchens to eliminate shadows and define zones effectively.
- Mix closed and open storage, pull-out drawers, and pantry organization systems to prevent dead zones and ensure every storage inch remains accessible and functional.
Why Large Kitchens Require Thoughtful Design Planning
Big kitchens fail when designers treat them like small kitchens with extra room. The problems are different. In compact spaces, you’re solving for lack of counter or storage. In large kitchens, you’re solving for wasted motion, poor sightlines, and zones that never get used.
Start by mapping out how the kitchen will actually function. Will it host multiple cooks? Do kids do assignments at one end while dinner preps at the other? Will it include a coffee bar, baking station, or butler’s pantry? Each of these needs dedicated space and infrastructure, outlets, task lighting, and logical placement relative to plumbing and ventilation.
Distance kills efficiency. If the fridge, sink, and range are spread across 20 feet with no intermediate work surfaces, every meal becomes a marathon. Permit requirements rarely apply to layout changes unless you’re moving gas lines or load-bearing walls, but it’s worth consulting a kitchen designer early. They’ll spot circulation bottlenecks and help you avoid the “bowling alley” effect where one long galley eats up the room with no secondary function.
Don’t assume more cabinetry is better. Overcrowding a large kitchen with upper cabinets can make it feel choppy and warehouse-like. Instead, mix open shelving, appliance garages, and full-height pantry units to break up visual mass while keeping storage accessible.
Creating Functional Zones in Your Large Kitchen
Zoning turns a big room into a series of purposeful stations. The goal is to group related tasks and tools so each area feels self-contained but flows into the next without backtracking.
Typical zones include:
- Prep zone: Sink, dishwasher, garbage disposal, compost bin, cutting boards, and knife storage.
- Cooking zone: Range or cooktop, oven(s), ventilation hood, spices, oils, utensils, and pot storage.
- Baking zone: Stand mixer, rolling pin, baking sheets, measuring cups, and a marble or butcher-block work surface.
- Beverage station: Coffee maker, electric kettle, mugs, and a small under-counter fridge for cream and cold brew.
- Serving/plating zone: Countertop near the dining area, stacks of plates, serving platters, and flatware.
Each zone should have dedicated counter space and nearby storage. If the coffee station is 8 feet from the mugs, it’s not really a station, it’s a decorative appliance.
For homeowners interested in kitchen organization strategies, grouping task-specific tools reduces clutter and speeds up meal prep. Zones also make it easier for multiple people to work simultaneously without crossing paths every 30 seconds.
The Kitchen Work Triangle in Spacious Layouts
The classic work triangle, connecting the sink, stove, and refrigerator in a compact path, still applies, but in large kitchens it often expands into multiple triangles or work zones.
In an L-shaped or U-shaped layout with an island, you might have a primary triangle for the main cook and a secondary prep area with its own sink and counter. This is common in homes where one person preps vegetables while another handles proteins or baking.
Keep each leg of the triangle between 4 and 9 feet. Shorter than 4 feet and you’re cramped: longer than 9 and you’re walking laps. If the kitchen includes a second sink (common in islands), treat it as the vertex of a new triangle rather than stretching the original one across the room.
Avoid running major traffic routes, like the path from the garage to the mudroom, straight through the triangle. It breaks workflow and creates safety issues when someone’s carrying a stockpot of boiling water.
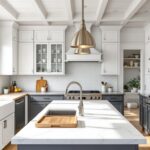
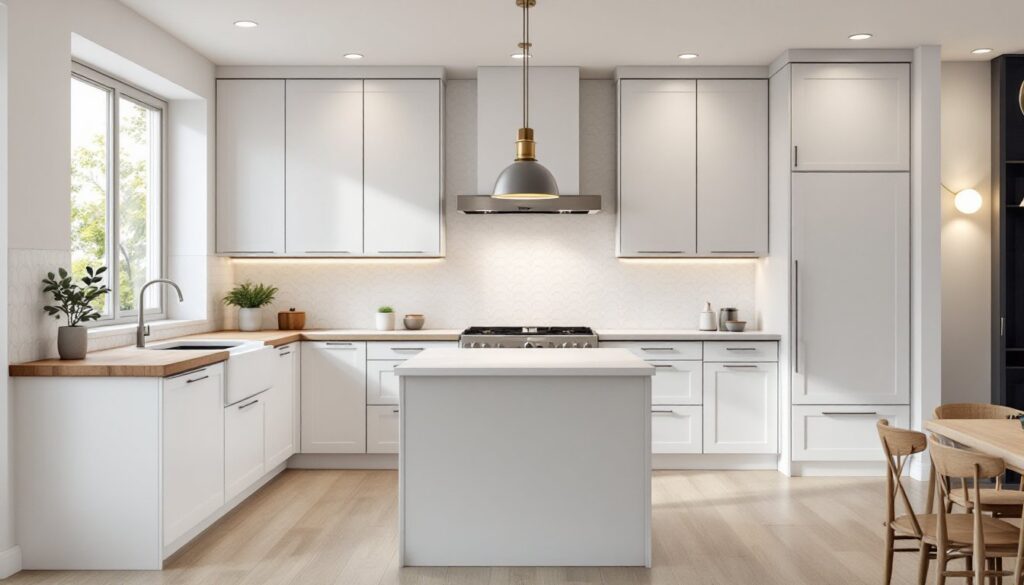
Choosing the Right Island Size and Placement
Islands anchor large kitchens, but the wrong size or placement turns them into obstacles. A good island improves circulation, adds work surface, and often houses the cooktop, sink, or seating.
Minimum clearances matter. Leave at least 42 inches between the island and perimeter cabinets for single-cook kitchens, and 48 inches for kitchens where multiple people work simultaneously. If the island includes seating, allow 24 inches of counter depth per person and at least 12 inches of knee space under the overhang.
Island dimensions typically range from 4 to 10 feet long and 2 to 4 feet deep. Anything over 10 feet starts to feel like a separate room and may require structural support if cantilevered or built with heavy stone. For islands over 6 feet, consider adding a second level: a lower prep surface at standard counter height (36 inches) and a raised bar at 42 inches for casual seating or serving.
If you’re installing a cooktop or sink in the island, factor in plumbing and electrical rough-ins early. Moving a gas line or drain typically requires a permit and adds $1,200–$3,500 depending on distance and local codes. Vent hoods for island cooktops need either a downdraft system or an overhead hood with ductwork routed through the ceiling, both more complex than wall-mounted venting.
Material choice affects durability and maintenance. Butcher block is forgiving and warm but requires regular oiling. Quartz is low-maintenance and stain-resistant. Granite and marble offer classic looks but need periodic sealing. For high-use prep islands, skip delicate materials like soapstone unless you’re prepared for patina.
Storage Solutions That Prevent Wasted Space
Large kitchens often have storage in all the wrong places, deep corner cabinets that swallow Tupperware, upper cabinets too high to reach, or pantries so big nothing stays organized.
Pull-out shelves and drawers beat fixed shelves every time. Base cabinets with full-extension soft-close drawers let you see and access everything without kneeling. For corner cabinets, use lazy Susans or LeMans-style swing-out units instead of the black hole of a standard blind corner.
Pantry design makes or breaks large kitchens. A walk-in pantry sounds luxurious but often wastes space if it’s just shelves along the walls. Add pull-out racks, adjustable shelving, and dedicated zones for canned goods, dry goods, small appliances, and bulk items. For pantries deeper than 24 inches, install shelves on both sides of the door and use the back wall for less-used items.
Vertical storage keeps counters clear. Pegboards, magnetic knife strips, and ceiling-mounted pot racks work well in kitchens with high ceilings (9 feet or more). Just make sure pot racks are at least 72 inches off the floor to avoid head injuries.
Many designers recommend mixing closed and open storage. Upper cabinets with glass fronts or open shelving for dishes and glassware break up solid runs of cabinetry, but they require discipline, dust and visual clutter are real. If you’re not naturally tidy, stick with closed storage or plan to edit your display items seasonally.
Appliance garages keep blenders, toasters, and food processors accessible but hidden. Size them to fit your largest appliance with the door closed, and add an interior outlet so you don’t have to drag everything out to the counter.
Lighting Strategies for Large Kitchen Spaces
Overhead lighting alone leaves large kitchens dim and shadowy. You need layered lighting: ambient, task, and accent.
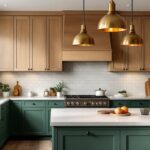
Ambient lighting provides overall illumination. Recessed LED cans on a grid (typically spaced 4 to 6 feet apart) work well, but avoid the “runway” look by mixing in pendants or a statement chandelier over the island or dining area. For kitchens with ceilings above 9 feet, use adjustable or directional recessed fixtures to angle light toward work surfaces.
Task lighting targets specific work zones. Under-cabinet LED strips or puck lights illuminate countertops and eliminate shadows when chopping or reading recipes. For islands without upper cabinets, pendant lights hung 30 to 36 inches above the counter provide focused light without blocking sightlines. If the island is longer than 6 feet, use multiple pendants spaced evenly, usually three for an 8-foot island.
Accent lighting adds depth and highlights architectural features. Toe-kick LEDs, in-cabinet lighting, or strips along the top of upper cabinets create ambient glow and make the kitchen feel larger at night. Dimmer switches on all circuits let you adjust mood and save energy.
Color temperature matters. 3000K (warm white) feels cozy and flattering for evening cooking and dining. 4000K (neutral white) improves visibility for detailed tasks like decorating cakes. Many homeowners exploring design ideas for spacious kitchens mix both: warm ambient lighting and cooler task lighting on separate switches.
For large kitchens with windows on multiple walls, plan electric lighting to balance daylight. South- and west-facing windows flood spaces with afternoon sun but may need cellular shades or UV film to prevent fading. North-facing kitchens often need more artificial light even during the day.
Color Schemes and Materials That Enhance Spaciousness
Large kitchens can handle bold color and mixed materials without feeling cramped, but the wrong palette makes them feel cold or disjointed.
Light neutrals, whites, soft grays, warm beiges, reflect light and unify long sightlines. They’re safe but can read as sterile if not layered with texture: matte-finish cabinets, honed countertops, textured tile backsplashes, or natural wood accents.
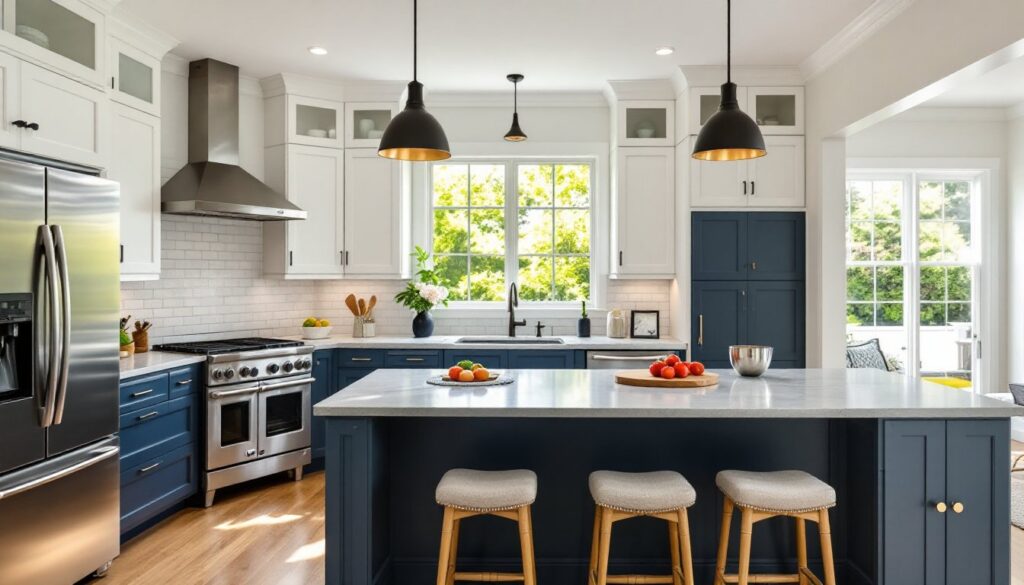
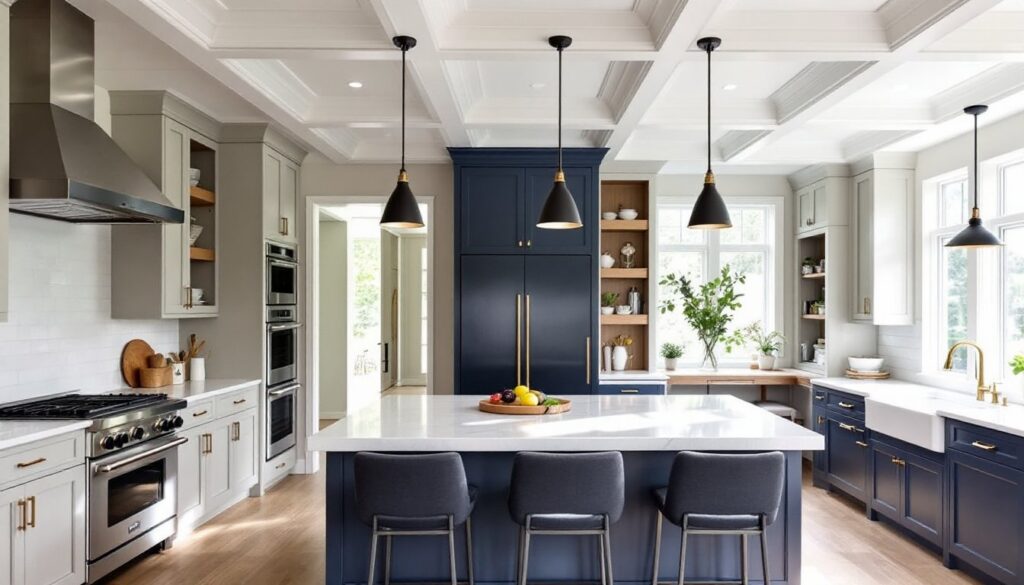
Two-tone cabinetry adds visual interest without overwhelming the space. Common approaches include darker base cabinets (navy, charcoal, forest green) with white or light gray uppers, or a contrasting island in a bold color while perimeter cabinets stay neutral. Just keep the split intentional, random color breaks look unfinished.
Flooring should tie the kitchen to adjacent spaces. Wide-plank hardwood or luxury vinyl plank (LVP) in 7- to 9-inch widths make large kitchens feel grounded. Tile works well for high-traffic or spill-prone areas: 12×24-inch or larger format tiles reduce grout lines and create a cleaner look. Avoid tiny mosaics or busy patterns on large expanses, they read as chaotic from a distance.
Backsplashes in large kitchens can go floor-to-ceiling behind the range or sink to create a focal point, but keep the rest simple. Subway tile, large-format slabs, or ship lap in a complementary color prevent the “too much going on” effect.
For those drawing inspiration from modern design resources, mixing metal finishes, matte black faucets with brushed brass hardware and stainless appliances, adds depth without clashing, as long as you limit it to three finishes max.
Ceiling treatments can define zones. A coffered ceiling over the island, shiplap in the dining nook, or painted beams in a contrasting color add architectural interest in kitchens with 10-foot-plus ceilings. Just make sure any changes don’t interfere with ductwork, recessed lighting, or structural elements.